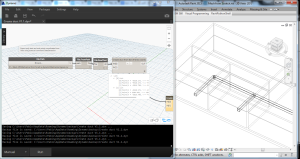
Today I'll explain the node we have created to generate ducts in Revit using lines coordinates from a cad file.
We will use the Revit API method
Document.NewDuct Method (XYZ, XYZ, DuctType), which needs 3 parameters:
2 XYZ : (Autodesk.Revit.DB.XYZ) for the first and second point of the duct.
DuctType: (Autodesk.Revit.DB.Mechanical.DuctType) The type of the duct.
DuctType: (Autodesk.Revit.DB.Mechanical.DuctType) The type of the duct.
Disclaimer: Parts of the code below has been written using examples from the Dynamo Forum. We use those part to tie our code.
First you have to import all libraries needed to run the python script inside Dynamo.
import clr
# Import DocumentManager and TransactionManager
clr.AddReference('RevitServices')
import RevitServices
from RevitServices.Persistence import DocumentManager
from RevitServices.Transactions import TransactionManager
# Import RevitAPI
clr.AddReference('RevitAPI')
import Autodesk
# Import Revit Nodes
clr.AddReference("RevitNodes")
import Revit
# Import from Revit DB and all its parts
from Autodesk.Revit.DB import *
# Import from Revit Creation where the Create.NewDuct class is.
from Autodesk.Revit.Creation import *
# Import ToProtoType, ToRevitType geometry conversion extension methods
clr.ImportExtensions(Revit.GeometryConversion)
Then we define Current document in order to avoid calling the function by its full class name.
#Defining Current document
doc = DocumentManager.Instance.CurrentDBDocument
We need to read a cvs file and split it into strings. We also need to remove first and last row of the csv because they contains no numeric data - first line is the header of the csv and the last is empty.
#Konrad K Sobon's code from http://goo.gl/D4v6LU
#Split single string at line breaks into a list of strings
xyzList = IN[0].rsplit("\n")
# Cull the first line, which is header
del xyzList[0]
# Cull the last line, which is blank
del xyzList[len(xyzList)-1]
#Create empty list for points x and y
x = []
y = []
Asking for an input for Duct Type but no entry is needed from outside the script.
#Define Ducttype but not need to be provided by user,
# it will the first it finds
Ducttype = IN[1]
This is the part that makes the trick. First iterating over the xzy list to split it into strings. Then we need create points and append it to lists x and y.
#Iterate over list using Konrad K Sobon list to points script
for xyz in xyzList:
    tpt = xyz.rsplit(',')
    #convert first coord to points and to mm, as revit api
    #works with decimal feets you need to divide the float into 304.8 to mantain mm
    x.append(Autodesk.Revit.DB.XYZ((float(tpt[0])/304.8),(float(tpt[1])/304.8),(float(tpt[2])/304.8)).ToPoint())
    #convert second coord to points and in to mm
    y.append(Autodesk.Revit.DB.XYZ((float(tpt[3])/304.8),(float(tpt[4])/304.8),(float(tpt[5])/304.8)).ToPoint())
Printing x and y point list to check numbers after running the script.
#Print x & y points created
OUT = x,y
Once we have the list of points we need to iterate again and convert each point into XYZ which is needed by the NewDuct method. Note that the method should be contained in a transaction in order to create the duct in Revit.
#Iterate over list using Konrad K Sobon list to points script
for xyz in xyzList:
    tpt = xyz.rsplit(',')
    #convert first coord to points and to mm, as revit api
    #works with decimal feets you need to divide the float into 304.8 to mantain mm
    x.append(Autodesk.Revit.DB.XYZ((float(tpt[0])/304.8),(float(tpt[1])/304.8),(float(tpt[2])/304.8)).ToPoint())
    #convert second coord to points and in to mm
    y.append(Autodesk.Revit.DB.XYZ((float(tpt[3])/304.8),(float(tpt[4])/304.8),(float(tpt[5])/304.8)).ToPoint())
And it's ready.
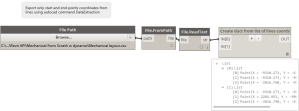
Now we need to feed it with a csv containing the coordinates of the lines. This should create one duct for each couple of points.
- Node showing X and Y list of points from a CSV file
In the next post we'll explain how to model the diffusers in place using blocks coordinates from a cad file.
If you have any problems, comments or even corrections for us, leave your comments and we'll be glad to answer them.
To Be Continued…
https://scaleid.wordpress.com/2015/09/01/mechanical-from-scratch-using-dynamo-part-2/


No hay comentarios:
Publicar un comentario