Mostrando entradas con la etiqueta MEP. Mostrar todas las entradas

miércoles, 7 de diciembre de 2016

Align Pipes at bottom

This is an old Revit macro I've created to align pipes to the bottom (BOP or BOI).
It asks for a pipe to be used as reference and the pipes to be aligned.

You need to create a new macro and paste the code below replacing all the content of the file. After this you will se a module named Align_Pipe

The module should look like this

martes, 1 de noviembre de 2016

Numbering Ducts

Last week I'd an encounter of the third kind with a common issue on my company. We needed to number all ducts using a code name per branch. In the past we solved it with an specific add-in or uncountable hours doing one by one by hand.

 If you have done it before you know you can't use a schedule or the mark numbers because it will not follow the order of the branch.

 So I decided to spend a few hours of my weekend finding a way to do it in Dynamo at later port it to a Revit Add-In. As usual, it took me 3 days to get with the solution.

https://www.explainxkcd.com/wiki/index.php/974:_The_General_Problem
What commonly happens...
Disclaimer: Please don't use any of this scripts in production. I can't assure it will don't not take control over your computer and start skynet or something.


The idea:
Having an element at the beginning of the branch and all the elements that conform it as two inicial inputs, we start iterating finding the next object that connects or clashes with it.


In the path I found different ways of doing it wrong and I would like to share them with you.

Wrong Way 1:
Extract the MEPCurve points to find coincidences but they don't convey in the same point even if the elements are connected.
We could try to order the points by location and use is to change the order of elements. 

Problem:
The problem is with the fittings that have more than 2 connectors and the time processing inside Dynamo.

Wrong way 2 :
Next I try using the node Geometry.DoesIntersect() included in dynamo. This function iterates over a list of ducts (y) and the first duct on branch (x)

def order(x,y):
    m=0
    y.Remove(x)
    output = []
    output.append(x)
    for e in y:
        for i in y:
            opt = Options()
            g = UnwrapElement(x).Geometry(opt)
            if g.DoesIntersect(UnwrapElement(i).Geometry(opt)[0]): 
                if i not in output :
                    x=i
                    output.append(i)
                    break
        m+=1

    return output

Problems:
First some duct fittings includes more than one geometry - solid, lines -  and the method changes regarding the type of geometry used.
Besides this  problem, the connection between elements could be really close to each other but not actually touching each other.

Wrong Way 3:
The next attempt was using FilteredElementCollector with a ElementIntersectsSolidFilter. The filter is a quick way of getting a list of elements.


def order(x,y):
    n, m=0 , 0
    y.Remove(x)
    output = []
    output.append(x)
    ids = []
    for i in y:
        ids.append(ElementId(i.Id))
    ids = List[ElementId](ids)
    while len(y) > m:
        opt= Options()
        out = x.Geometry()
        for i in out:
            try:
                filter =  ElementIntersectsSolidFilter(i)
                collector = FilteredElementCollector(doc,ids).WherePasses(filter).ToElements()
                for e in collector:
                    if e not in output:
                        output.append(e)
                        ids.Remove(e.Id)
                        x = y[m]
            except:
                pass
        m+=1

    return output

Problem:
The loop While randomly clashes Dynamo when running. This could be solve using For instead but then we need two list to avoid removing items of  the one iterating.
Again, if the element does not really intersects the filter won't detect it.

Right Way (aka less wrong):
Each element has a bounding box around that wraps up it a little bigger than the object geometry. Using FilteredElementCollector with a BoundingBoxIntersectsFilter.
Note I've added a function to create a collector of ElementIds in order to use it to filter just the elements I prompt the user to select.
In order to be sure the Bounding boxes intersect the elements I've make it a little bit bigger - +/- XYZ(1,1,1) .


def listids(y):
    output = []
    for i in y:
        output.append(ElementId(i.Id))
    # convert list into List[ElementId] to create a specific Id collections needed by the filter
    output =ids = List[ElementId](output)
    return output

def order(x,y):
    m=0
    y.Remove(x)
    output = []
    output.append(x)
    ids = listids(y)
    while len(y) > m:
        el = UnwrapElement(x)
        min = el.get_BoundingBox(doc.ActiveView).Min - XYZ(1,1,1)
        max = el.get_BoundingBox(doc.ActiveView).Max +XYZ(1,1,1)
        out = Outline(min,max)
        filter =  BoundingBoxIntersectsFilter(out)
        if len(ids) > 0:
            collector = FilteredElementCollector(doc,ids).WherePasses(filter).ToElements()
            for i in collector:
                if i not in output:
                    output.append(i)
                    ids.Remove(i.Id)
                    x = i
        m+=1
    return output

Result: 
The result of this will be a list of elements in geometrical order defined using an Element as start.
Have in mind that Bounding boxes cover all objects included in the element, even lines so you need to have a really clean family for this to work.
If is not the case you always can run the script twice, before and after the fitting in question.


Hope you find any of this helpful and let me know if you have an idea to improve it.

EDIT: Tons Typos, hate blogspot

jueves, 28 de julio de 2016

Mechanical from scratch using Dynamo [Part 2]

fromcadtorevit-02
Today I'll explain the node we have created to generate ducts in Revit using lines coordinates from a cad file.
We will use the Revit API method Document.NewDuct Method (XYZ, XYZ, DuctType), which needs 3 parameters:
2 XYZ : (Autodesk.Revit.DB.XYZ) for the first and second point of the duct.
DuctType: (Autodesk.Revit.DB.Mechanical.DuctType) The type of the duct.
Disclaimer: Parts of the code below has been written using examples from the Dynamo Forum. We use those part to tie our code.
First you have to import all libraries needed to run the python script inside Dynamo.
import clr
# Import DocumentManager and TransactionManager
clr.AddReference('RevitServices')
import RevitServices
from RevitServices.Persistence import DocumentManager
from RevitServices.Transactions import TransactionManager
# Import RevitAPI
clr.AddReference('RevitAPI')
import Autodesk
# Import Revit Nodes
clr.AddReference("RevitNodes")
import Revit
# Import from Revit DB and all its parts
from Autodesk.Revit.DB import *
# Import from Revit Creation where the Create.NewDuct class is.
from Autodesk.Revit.Creation import *
# Import ToProtoType, ToRevitType geometry conversion extension methods
clr.ImportExtensions(Revit.GeometryConversion)

Then we define Current document in order to avoid calling the function by its full class name.

#Defining Current document
doc = DocumentManager.Instance.CurrentDBDocument

We need to read a cvs file and split it into strings. We also need to remove first and last row of the csv because they contains no numeric data - first line is the header of the csv and the last is empty.


#Konrad K Sobon's code from http://goo.gl/D4v6LU
#Split single string at line breaks into a list of strings
xyzList = IN[0].rsplit("\n")
# Cull the first line, which is header
del xyzList[0]
# Cull the last line, which is blank
del xyzList[len(xyzList)-1]


#Create empty list for points x and y
x = []
y = []

Asking for an input for Duct Type but no entry is needed from outside the script.

#Define Ducttype but not need to be provided by user,
# it will the first it finds
Ducttype = IN[1]

This is the part that makes the trick. First iterating over the xzy list to split it into strings. Then we need create points and append it to lists x and y.


#Iterate over list using Konrad K Sobon list to points script
for xyz in xyzList:
    tpt = xyz.rsplit(',')
    #convert first coord to points and to mm, as revit api
    #works with decimal feets you need to divide the float into 304.8 to mantain mm
    x.append(Autodesk.Revit.DB.XYZ((float(tpt[0])/304.8),(float(tpt[1])/304.8),(float(tpt[2])/304.8)).ToPoint())
    #convert second coord to points and in to mm
    y.append(Autodesk.Revit.DB.XYZ((float(tpt[3])/304.8),(float(tpt[4])/304.8),(float(tpt[5])/304.8)).ToPoint())

Printing x and y point list to check numbers after running the script.


#Print x & y points created
OUT = x,y

Once we have the list of points we need to iterate again and convert each point into XYZ which is needed by the NewDuct method. Note that the method should be contained in a transaction in order to create the duct in Revit.


#Iterate over list using Konrad K Sobon list to points script
for xyz in xyzList:
    tpt = xyz.rsplit(',')
    #convert first coord to points and to mm, as revit api
    #works with decimal feets you need to divide the float into 304.8 to mantain mm
    x.append(Autodesk.Revit.DB.XYZ((float(tpt[0])/304.8),(float(tpt[1])/304.8),(float(tpt[2])/304.8)).ToPoint())
    #convert second coord to points and in to mm
    y.append(Autodesk.Revit.DB.XYZ((float(tpt[3])/304.8),(float(tpt[4])/304.8),(float(tpt[5])/304.8)).ToPoint())

And it's ready.


dynamo-revit
Now we need to feed it with a csv containing the coordinates of the lines. This should create one duct for each couple of points.
dynamo
Node showing X and Y list of points from a CSV file
In the next post we'll explain how to model the diffusers in place using blocks coordinates from a cad file.
If you have any problems, comments or even corrections for us, leave your comments and we'll be glad to answer them.

Mechanical from scratch using Dynamo [Part 1]

fromcadtorevit-02
I would like to share with you a project where I'll try to create an HVAC system from a CAD sketch into Revit using Dynamo. This is not meant to be a new procedure to design mechanical systems more than a study of Dynamo capabilities on MEP modeling.
For this I've created this milestones/steps I'll try to accomplish on the next posts :
  1. Model a simple building on Revit and export to CAD.
  2. Sketch an HVAC layout with a supply system and a few diffusers.
  3. Export the location of the elements back to Revit using Dynamo.
  4. Change the sizes of the elements according to the flow needed on each room.
  5. Tag all elements having in count it's locations and sizes.
On this post I'll talk about the state of arts of the tools
  • My own Dynamo Node to create ducts from lines (still in beta but I'll publish it as soon as I could). Right now it only use 2 points to create a single duct but I'm trying to make it work using several points extracted from lines of a cad file using DataExtraction command.
CreateDuct node
CreateDuct node Beta
  • Node FamilyInstancebyPoint to locate the air terminals using the coordinates extracted from the cad files, as previously using DataExtraction command from Autocad.
    Family instance by point
    Family instance by point
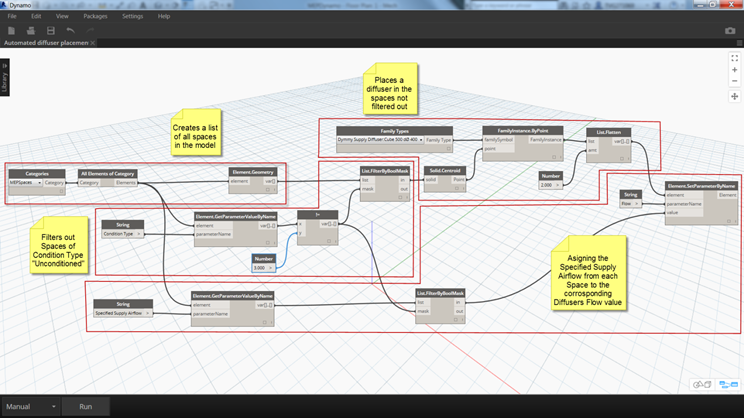
  • Change diffusers flows according to room volume. The idea is to use the work on this node to detect how many diffusers are in the room and slip the flow on each one based on the room air volume
    http://autodesk.typepad.com/bimtoolbox/2015/07/automated-diffuser-placement-in-early-stage-mep-design.html
    Automated diffuser placement in early stage MEP design by Thomas Gregersen
  •  Konrad "Create annotations tag" node to place the tags on the elements according the sizes and orientation following a tagging standard.
    Dimitar Venkov example using Konrad
    Dimitar Venkov example using Konrad's node
As this will be an inductive study, I can't guaranty the success of the project but on the next posts I'll continue sharing my learned lessons using all these tools.
Pick anything you need and share, but please respect others authors rights.
To Be Continued...

Published first at https://scaleid.wordpress.com/2015/08/29/mechanical-from-scratch-using-dynamo/